
In real-world web-applications, you nearly always want some
way to authenticate users – either all of them, or some subset of them – in
order to gate access to some features. In ASP.NET Web API, developers are used
to adding the [Authorize] attribute to controller methods, and then
relying on a membership database to store users and their roles. With Amazon Cognito User Pools,
however, we can offload the storage, management and authentication of users and
their roles, while still leveraging the [Authorize]
attribute plus a custom AuthorizationHandler class, to control access to Web
API methods.
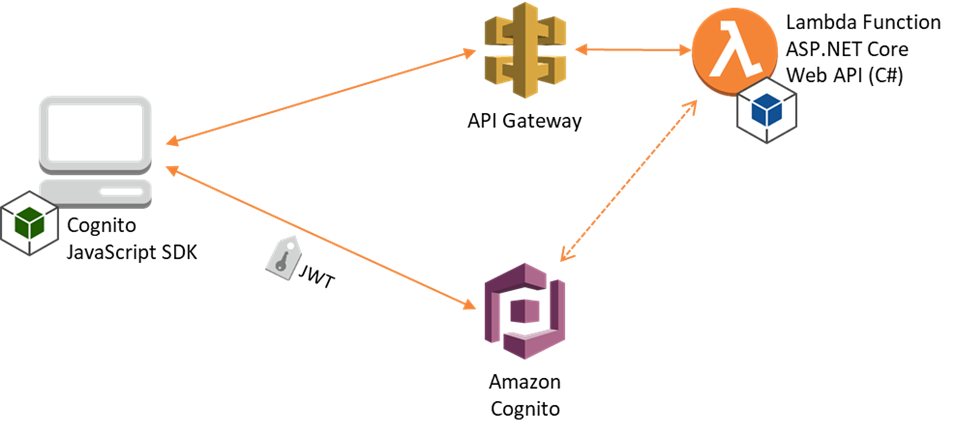
In this walk-through, we’ll create an Amazon Cognito User
Pool to store and authenticate our users, an ASP.NET Core Web API
serverless project that will be hosted in AWS Lambda and fronted by API Gateway, and a simple
Calendar SPA consisting of HTML and JavaScript, which will be part of the Web
API project and served by the Lambda function. Our client-side script will
pass a user’s login credentials to Cognito, get back a JSON
Web Token (JWT), and pass that in the HTTP Authorization header to our Web
API methods that require authorization. We’ll allow reading calendar events for
everybody, but restrict creating and editing them to users in a group that we
specify.
Create an Amazon Cognito User Pool
Our Cognito User Pool will contain our users, and the groups to which they belong. For this walk-through, we’ll create and configure the User Pool using the AWS Management console, and then add a couple of users manually. For an application with lots of users, you would typically bulk import your users, or allow them to register via your web-application, both of which are supported in Cognito.
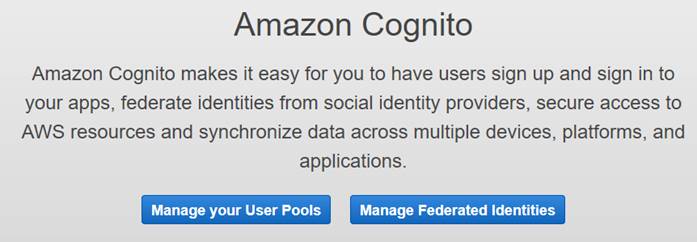
In the AWS Management Console, navigate to the AWS Cognito
home page, and then click the “Manage your User Pools” button.
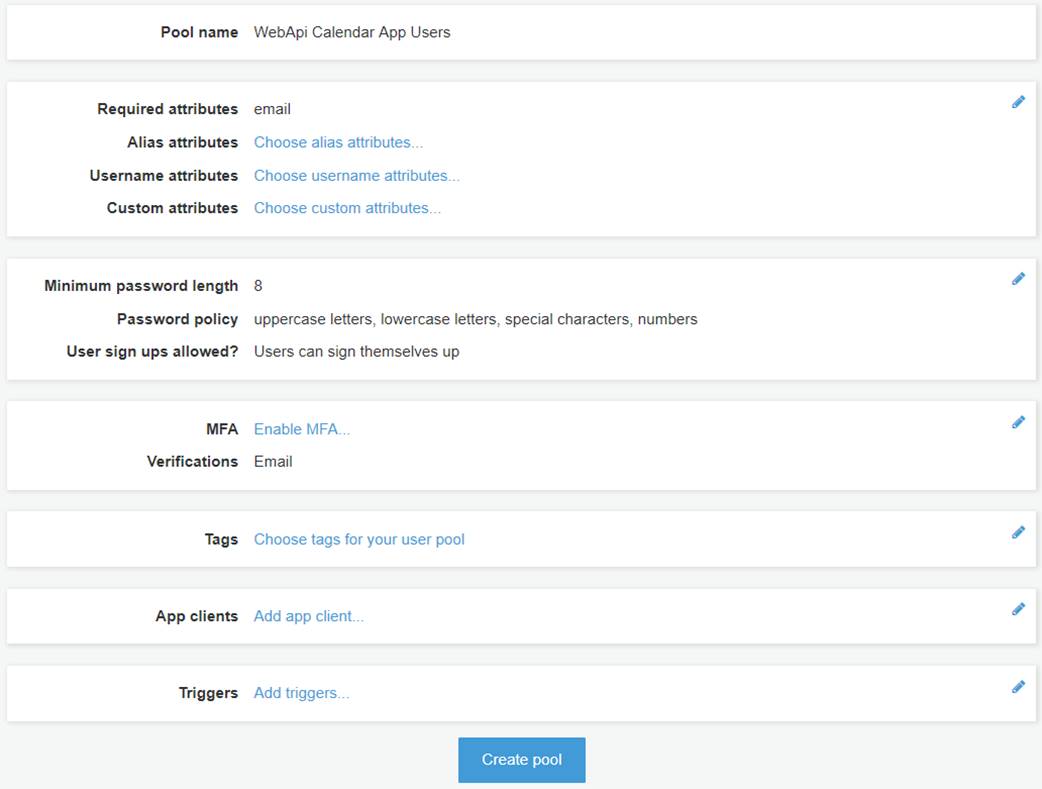
Next, create a user pool by clicking the blue, “Create a
user pool” button at the top right. Give your user pool a name; for this
walk-through, we’ll use the name, “WebApi Calendar App Users”, and then
choose “Review Defaults” to see the default settings. You should see something
like the following:
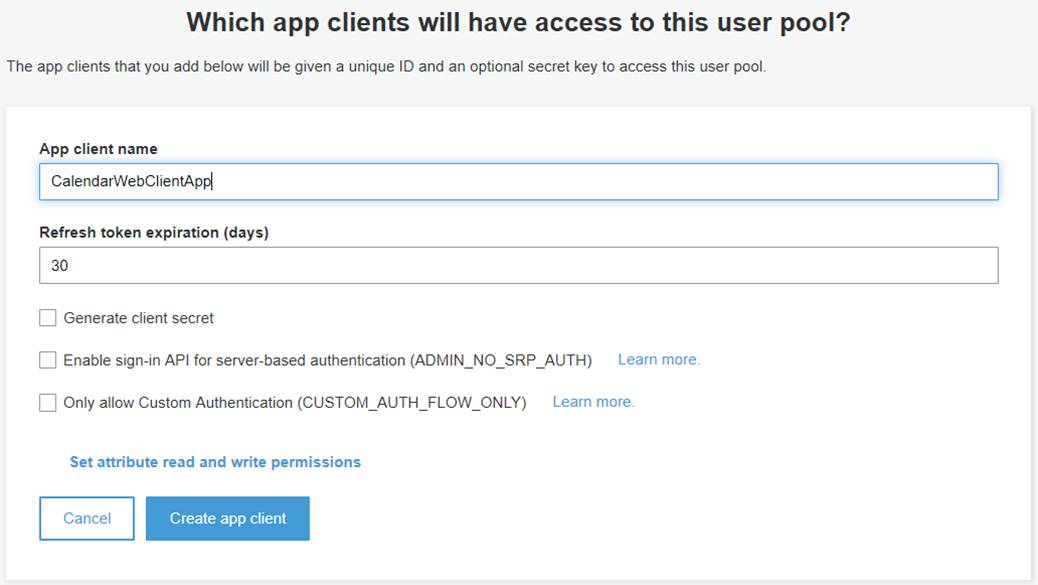
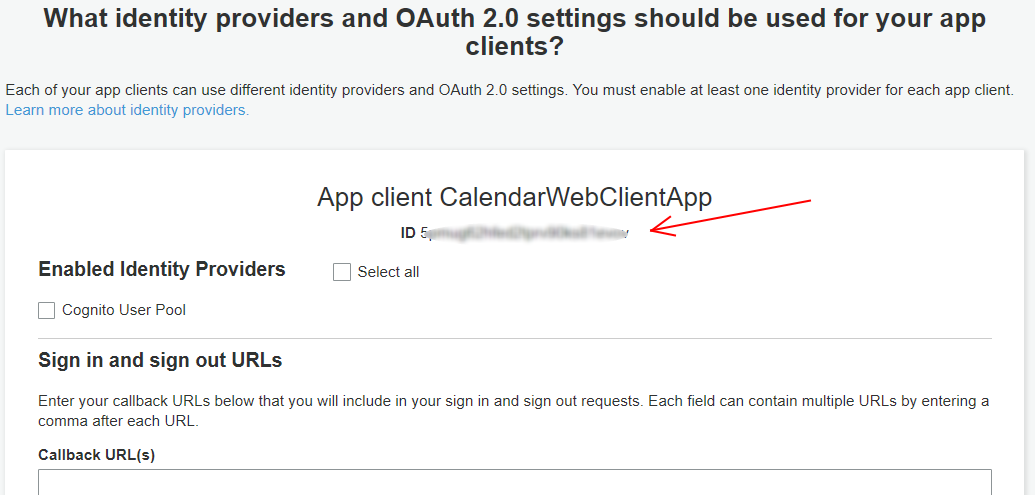
Before we create the pool, let’s add an App Client that is
allowed to authenticate against our pool. Click the, “Add app client…” link,
which takes you to the App Clients list for this User Pool. There aren’t any
yet, so click the, “Add an app client” link, and specify a name for the
JavaScript web-app we’ll be creating later. We’ll use “CalendarWebClientApp”
for this walk-thru. You need to uncheck the “Generate client secret”
option, as the Cognito JavaScript SDK doesn’t support using secrets (since
anyone can view the source code in their browser). You should see something similar
to the image below:
Create the app client, then the “Return to pool details”
link. We can now see our App Client name next to “App clients”. Click the blue
“Create Pool” button to create the User Pool. After the pool is successfully
created, copy the Pool Id from the top of the page and save it for later. Then
click the “App client settings” link in the same navigation menu, and locate
the App client ID for CalendarWebClientApp, and save that for later
also.
Finally, let’s create a Cognito group and a user for it.
We’ll log into our web application with this user later. Click the “Users and
groups” link in the left-hand navigation menu, then on the Groups tab, create a
new group called, “CalendarWriter”. We don’t need to select an IAM role. On
the Users tab, create a new user. Pick a username, temporary password, and supply
an email address. Uncheck “Mark phone number as verified” unless you want to
provide a phone number. Then, add the user you just created to the
“CalendarWriter” group. That’s the group we’ll require to create and edit
events. New users created via the admin console this way will have to choose a
new password on first login – we’ll handle that in JavaScript.
Now we’re ready to create the ASP.NET Core Web API project
that will run in our Lambda function.
Create AWS Serverless Application (.NET Core)
Ensure you have already installed the latest version of the AWS Toolkit for Visual Studio, which installs the project templates for AWS projects. We’re creating a new “AWS Serverless Application (.NET Core)” project. After selecting that project type, we’ll choose the “ASP.NET Core Web API” blueprint from the blueprints list. This will generate skeleton code for our project, and also a CloudFormation template that will deploy the solution. This blueprint relies on the Amazon.Lambda.AspNetCoreServer NuGet package to translate calls between API Gateway and the ASP.NET Core framework.
Note that you can do all this on Mac OS X or Linux also.
Once you have the .NET Core framework installed, you can install the AWS
templates with the dotnet new command:
Bash
@:~$
dotnet new -i Amazon.Lambda.Templates::*
The “Lambda ASP.NET Core Web API” template (short
name lambda.AspNetCoreWebAPI) is then available to create new projects. You
could then use Visual Studio Code, or any other code editor to write your code,
and deploy using the CLI or AWS Management Console. For this walk-through,
though, we’ll use Visual Studio 2017 and the AWS Toolkit for Visual Studio.
The ASP.NET Core Web API blueprint project template creates
two entry point classes, LocalEntryPoint.cs and LambdaEntryPoint.cs. The
LocalEntryPoint class is used when running in your local dev environment, and
leverages Kestrel, the ASP.NET Core webserver, while the LambdaEntryPoint
relies on API Gateway. This makes it really easy to test out your project
locally before deploying it. In fact, you should make sure everything is set up
properly by building the project and then running it. Verify the endpoint http://localhost:5000/api/values
returns the json array ["value1","value2"] by visiting it
in a web browser. That will call the ValuesController’s Get method.
The blueprint project also creates an S3ProxyController,
which we don’t need for this project, so we can delete that. We can also remove
the CloudFormation template parameters ShouldCreateBucket and BucketName, the
conditions CreateS3Bucket and BucketNameGenerated, and all references to them
from the serverless.template file.
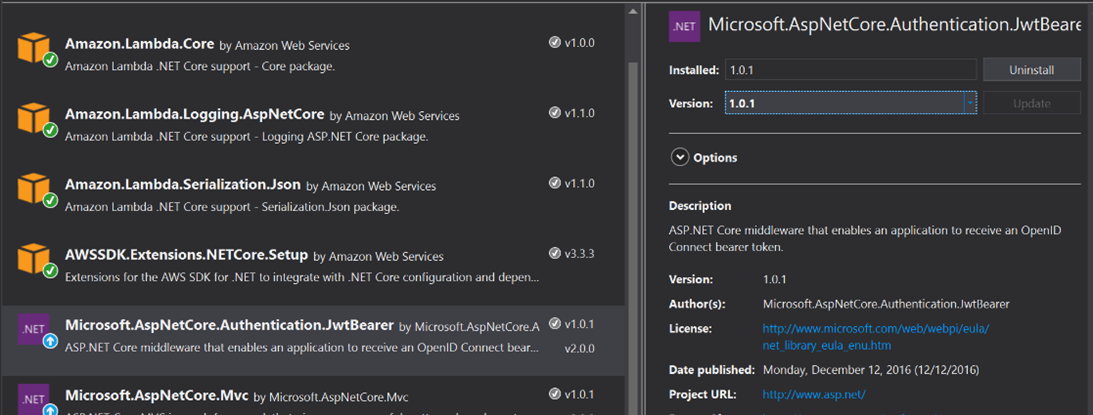
Before we write any code, let’s add the NuGet package,
“Microsoft.AspNetCore.Authentication.JwtBearer”, v1.0.1. Be careful not to
install the latest version, since it requires .NET Standard 2.0, which
isn’t yet supported in AWS Lambda. You’ll notice that some other NuGet packages
are already installed as part of the project template. You can optionally
remove the AWSSDK.S3 package, and then delete this line from
Startup.ConfigureServices so that the project will still build: services.AddAWSService();
Once we add the
Microsoft.AspNetCore.Authentication.JwtBearer v1.0.1 package, we can add our
implementation of IAuthorizationRequirement, and our customer
AuthorizationHandler class as in the following code samples.
C#
class CognitoGroupAuthorizationRequirement : IAuthorizationRequirement
{
public string CognitoGroup { get; private set; }
public CognitoGroupAuthorizationRequirement(string cognitoGroup)
{
CognitoGroup = cognitoGroup;
}
}
C#
class CognitoGroupAuthorizationHandler : AuthorizationHandler<CognitoGroupAuthorizationRequirement>
{
protected override Task
HandleRequirementAsync(AuthorizationHandlerContext
context, CognitoGroupAuthorizationRequirement
requirement)
{
if
(!context.User.HasClaim(c => c.Type == "cognito:groups"))
{
context.Fail();
return Task.CompletedTask;
}
var
group = context.User.FindFirst(c => c.Type == "cognito:groups").Value;
if
(group == requirement.CognitoGroup)
{
context.Succeed(requirement);
}
else
{
context.Fail();
}
return Task.CompletedTask;
}
}
Our custom handler just checks to see if the Cognito group
is equal to whatever group we specify in the Authorization Policy we add. Let’s
register our policy and add a singleton of the handler class by editing the
Startup.ConfigureServices method to look like the below example.
C#
public void ConfigureServices(IServiceCollection services)
{
// add our Cognito group authorization
requirement, specifying CalendarWriter as the group
services.AddAuthorization(
options =>
options.AddPolicy("InCalendarWriterGroup", policy => policy.Requirements.Add(new CognitoGroupAuthorizationRequirement("CalendarWriter")))
);
// add a singleton of our cognito
authorization handler
services.AddSingleton<IAuthorizationHandler, CognitoGroupAuthorizationHandler>();
services.AddMvc();
// Pull in any SDK configuration from
Configuration object
services.AddDefaultAWSOptions(Configuration.GetAWSOptions());
}
For our simple Calendar app, we’ll create one controller,
“EventsController”, and one model, “CalendarEvent”. The model will be
serialized and deserialized automatically as it’s passed to and from the
controller methods. It’s just a POCO class that maps to the required properties
of a FullCalendar
event. FullCalendar is an open-source JavaScript calendar built on JQuery,
which we’ll use in the client-side portion of the project.
C#
public class CalendarEvent
{
public string id { get; set; }
public string title { get; set; }
public bool allDay { get; set; }
public DateTime start { get; set; }
public DateTime end { get; set; }
}
In our API controller, we’ll implement three methods – a
Get() method that returns all events in a date range, a Post() method to create
new events, and a Put() method to edit existing events. We’ll decorate the
Put() and Post() methods with our custom [Authorize] attribute and specify the
InCalendarWriterGroup policy we registered in Startup.ConfigureServices. To
keep things really simple, for this walk-thru we’ll just be storing events in a
static collection in the controller – in a real application, you would want to
persist them somewhere durable and shared between different Lambda invocations,
like Amazon DynamoDB, a
serverless NoSQL database. Lambda functions will “go away” after about 5
minutes of non-use, so any events we add will disappear when that happens. Also
note the “test event” we create in the constructor – that’s just to demonstrate
the ability to see events when not authenticated.
C#
[Route("api/[controller]")]
public class EventsController : Controller
{
private static List<CalendarEvent> events;
public EventsController()
{
if (events == null)
{
var calEvent = new CalendarEvent()
{
id = Guid.NewGuid().ToString(),
title = "Test Event
Title",
allDay = false,
start = DateTime.Now,
end = DateTime.Now.AddHours(2)
};
events = new List<CalendarEvent>( new[] { calEvent } );
}
}
// GET api/events
[HttpGet]
public IEnumerable<CalendarEvent> Get(DateTime? start, DateTime? end)
{
start = start ?? new DateTime(DateTime.Now.Year, DateTime.Now.Month, 1);
end = end ?? new DateTime(DateTime.Now.Year, DateTime.Now.Month, DateTime.DaysInMonth(DateTime.Now.Year, DateTime.Now.Month));
return events.FindAll(x => x.end >=
start && x.start <= end);
}
// POST api/events
[HttpPost]
[Authorize(Policy = "InCalendarWriterGroup")]
public void Post([FromForm]CalendarEvent calEvent)
{
calEvent.id = Guid.NewGuid().ToString();
events.Add(calEvent);
}
// PUT api/events/5
[HttpPut("{id}")]
[Authorize(Policy = "InCalendarWriterGroup")]
public void Put(string id, [FromForm]CalendarEvent calEvent)
{
var index = events.FindIndex(x => x.id ==
id);
events[index] = calEvent;
}
}
Finally, we’ll add code to the Startup.Configure method
configure the JWT authentication options, and also to enable our app to serve
static files (like html, css and JS) as well default files, so we don’t have to
specify “index.html” in the URL of the main page. Static files support is
enabled with the NuGet package, “Microsoft.AspNetCore.StaticFiles”, v1.0.0. Again,
don’t use the latest version since that requires .NET Standard 2.0.
We’re just hard-coding the “Audience” (the app client ID
from Cognito) and “Authority” (based on User Pool ID) values for simplicity. In
a production app, you could pass those values as Environment Variables at
deploy time, then read the values with Environment.GetEnvironmentVariable. Your
Configure method should look like this.
C#
public void Configure(IApplicationBuilder app, IHostingEnvironment env, ILoggerFactory loggerFactory)
{
loggerFactory.AddLambdaLogger(Configuration.GetLambdaLoggerOptions());
app.UseDefaultFiles(); //needs to be before
the app.UseStaticFiles() call below
app.UseStaticFiles();
app.UseJwtBearerAuthentication(new JwtBearerOptions
{
Audience = "" ,
Authority = "https://cognito-idp..amazonaws.com/" ,
AutomaticAuthenticate = true,
RequireHttpsMetadata = false //false for dev
only, for production the JWT should be sent via https
});
app.UseMvc();
}
To build the “Authority” value, just plug in your region and
User Pool Id that you copied earlier. If your region was Oregon (us-west-2)
and your User Pool Id was us-west-2_AbcDefGhi, for example, your
Authority string would be “https://cognito-idp.us-west-2.amazonaws.com/us-west-2_AbcDefGhi”.
For testing locally without worrying about certificates, set “RequireHttpsMetadata”
to false. For any production app, you should set this to true so
that the JWT token is only sent over HTTPS. The JwtBearer middleware validates
the JWT’s digital signature, checks the expiration and does other checks, then creates
a ClaimsPrincipal for the current user.
Now we’re ready to add our client-side application!
Add HTML, CSS and JavaScript
ASP.NET Core uses the folder wwwroot as web root by default, so we’ll create that folder in our project, and add our web files to it. You can either install the JavaScript files manually, or using a tool like npm. We’ll need the following libraries for this demo app. I installed the Amazon Cognito, FullCalendar and Moment.js files locally, and referenced the JQuery files via URL, but you can change that to suit your needs. I recommend installing with npm to ensure you get all the dependencies, but links to downloads are included below.
The API Gateway – Lambda integration doesn’t currently
support serving default files from web root, so we’ll place our index.html
file in a folder called calendar, inside of wwwroot. Since this demo app
is very simple, I embedded the JavaScript used to authenticate and create/edit
events inline. You can see the full source code in the Git repo. We
set the source for events in FullCalendar to “../api/events”
(FullCalendar passes the start and end arguments), and add handlers for dayClick
and eventClick events. Reading events (the “Get()” method in
EventsController) doesn’t require authorization.
Creating or editing events will require a valid JWT showing
the user in the CalendarWriter group. So we add a login button to our HTML, and
wire it up to an authentication flow. When authenticating, we’ll handle the onSuccess,
onFailure, and newPasswordRequired events. On first login, the newPasswordRequired
event is raised. We’ll prompt the user for a new password, and then they’ll
need to log in with it. This will change the user’s status in Cognito from FORCE_CHANGE_PASSWORD
to CONFIRMED.
The JavaScript in the authenticate() function reads
the username and password values from the form, configures the user pool (with
the User Pool Id and App Client Id you copied earlier), then calls the CognitoUser.authenticateUser()
function which makes the call out to Amazon Cognito. The response (if
successful) includes the JWT token, which we put into local storage to use for
subsequent Post or Put calls to our calendar API. To keep things simple for
this walk-thru, we’re not implementing any refresh strategy – when the JWT
expires after 1 hour, subsequent PUT/POST calls will fail with a 401
Unauthorized response.
JavaScript
function authenticate() {
var authenticationData = {
Username: $('#username').val(),
Password: $('#password').val(),
};
var CognitoIdentityServiceProvider =
AWSCognito.CognitoIdentityServiceProvider;
var authenticationDetails = new CognitoIdentityServiceProvider.AuthenticationDetails(authenticationData);
var CognitoUserPool = AmazonCognitoIdentity.CognitoUserPool;
var poolData = {
UserPoolId: 'us-west-2_AbcDefGhi', //user pool id
ClientId: '' //app client id
};
var userPool = new CognitoUserPool(poolData);
var userData = {
Username: authenticationData.Username,
Pool: userPool
};
var cognitoUser = new CognitoIdentityServiceProvider.CognitoUser(userData);
cognitoUser.authenticateUser(authenticationDetails, {
onSuccess: function (result) {
localStorage.setItem('jwt',
result.getIdToken().getJwtToken())
console.log('jwt token: ' + localStorage.getItem('jwt'));
$('#loginform').dialog('close');
$('#login').prop("disabled", true);
},
onFailure: function (err) {
alert(err);
},
newPasswordRequired: function (userAttributes, requiredAttributes) {
// the api doesn't accept this field back
delete userAttributes.email_verified;
delete userAttributes.phone_number_verified;
$('#loginform').dialog('close');
$('#changepass').dialog({ modal: true, title: '1st Login - Change Password', width: 360 });
$('#changebtn').click(function () {
if ($('#newpass').val() == $('#confirmpass').val()) {
cognitoUser.completeNewPasswordChallenge($('#newpass').val(), userAttributes, this);
alert('Password changed, please log in with the
new password');
$('#changepass').dialog('close');
Password: $('#password').val('');
showLogin();
}
});
}
});
}
One important note: we’re implementing the UI and
authentication flow ourselves, in HTML and JavaScript. Alternatively, you could have Cognito
host the login form and handle the change password flow, and other
scenarios as well, including customizing
the form with your own logo and CSS.
You can run the entire project locally from Visual Studio.
Once the command-line window shows up, just go to http://localhost:5000/calendar/
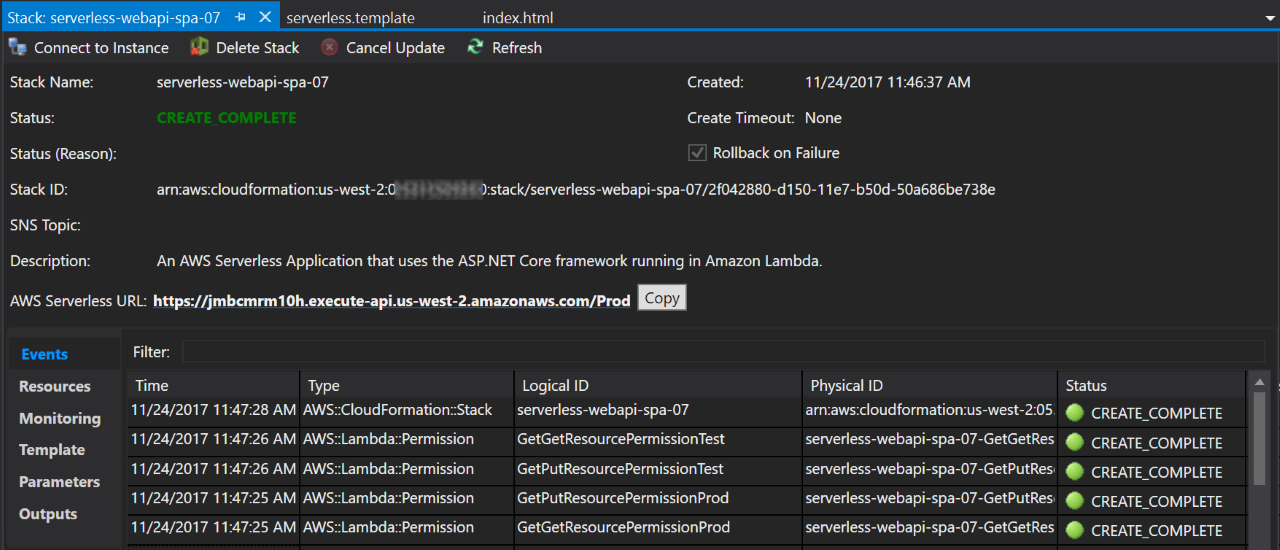
in a browser (don’t forget the trailing slash). To deploy to AWS, first stop
the application (if it’s running locally), then right-click the project node in
Solution Explorer and select, “Publish to AWS Lambda”. The AWS Toolkit’s
CloudFormation tab will open and track the status of the stack as it’s
deployed. When it is finished, you can copy the AWS Serverless URL into a
browser, and add “/calendar/”. The initial load will take a few seconds, as it
is a cold start for the Lambda function.
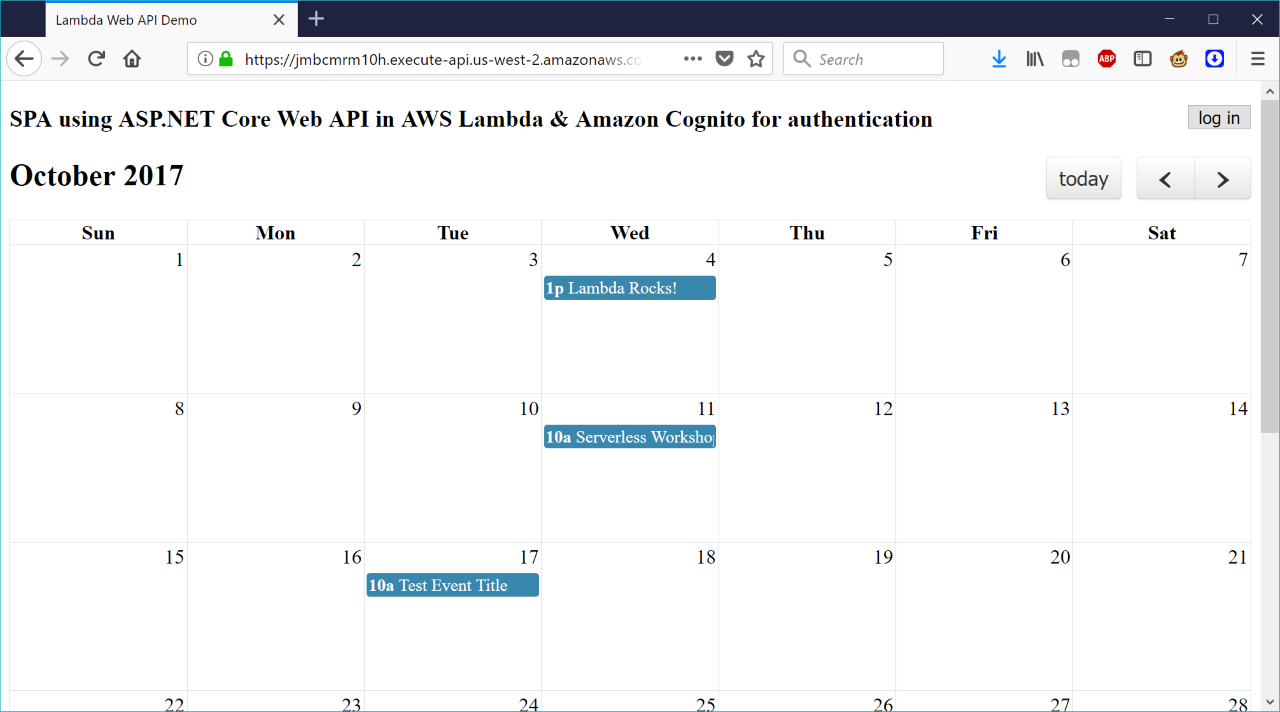
Once the calendar UI is loaded, and the test event that is
generated in EventController’s constructor shows up, you can try adding a new
event by clicking on any day box in the calendar. Until you log in
successfully, you’ll see an alert, “You are not authenticated, please log in
(401)”. After you’ve successfully changed your password (the first time only)
and then logged in, you can create and edit events. Note that the JavaScript
here is just to demo the minimum Cognito functionality to support a custom AuthorizationHandler
in ASP.NET Core.
Note:
Keep in mind that EventsController is storing events in a static collection. Our Lambda function
could experience a "cold start" at any time, erasing any events you create - especially after a few
minutes of inactivity. For any real application, you will want to store your events in a database. DynamoDB
is a great option for this.
Conclusion
Hosting an entire website in Lambda is a cool and fun technique, but using the Lambda function to serve static content isn’t optimal – Lambda cold starts mean the index.html page will be slow to load for users whenever the website hasn’t been visited for more than a few minutes. Plus, there’s the limitation of not serving up a default page from the root of our site. To solve both issues, you could move all the static content – html, css and JavaScript – to an Amazon S3 bucket, and enable static website hosting. You can also use your own domain for both the API Gateway API and for the S3 bucket, setting the domain root (yourdomain.com or www.yourdomain.com) to point to the S3 bucket, and a CNAME, like api.yourdomain.com, pointing at your API Gateway API. That way, your webpage can load immediately, and show an “updating” message to users if the API is responding slowly.
If you have an existing ASP.NET Web API
project that you’d like to migrate to run in AWS Lambda, rather than starting
from a new project template, check out Norm Johanson’s blog, “Deploy
an Existing ASP.NET Core Web API to AWS Lambda”.


 The Bangkok Survivor's Handbook
 The Rough Guide to Bangkok

